How to Efficiently Encode Images In WordPress
Last updated on
Sep 19th, 2024
|
7 min
Once you start with NitroPack, you can freely choose your integration platform.
Everything you need to know about
NitroPack features and compatibilities.
Whether you run a blog or
an agency, we have a
partnership opportunity for you!
The place to learn how to
improve your web performance,
how to get the most out of
NitroPack, and what is coming
next to our product.

You’ve done a performance audit on your website and come across the PageSpeed Insights report. You saw an “Efficiently Encode Images” prompt that the tool says may help improve your site performance.

Not sure what that means? Then, you’ve come to the right place.
With this article, you’ll know what this type of encoding means and how to efficiently encode images. You’ll also learn other optimization tips to boost site speed.
Let’s get started!
Image encoding is the process of reducing the file size of a photo without compromising visual quality.
This is done through different tactics like image compression and using the right image format. We’ll talk more about how to efficiently encode images later. Suffice it to say that efficient image encoding can help boost your website performance and user experience. How? Let’s talk about that in the next section.
When you upload uncompressed images to your site, they’ll be served at a high quality. This leads to larger file sizes. You can also end up with large file sizes when you use old image formats such as JPEG and PNG.
Because browsers take longer to download large file sizes, the site visitor will have to wait longer for the website to load fully. If you have multiple uncompressed images or JPEG and PNG images on your site, these image file sizes will add up quickly, making your page extra slow.
Images that load slowly negatively also affect the user experience as measured by Core Web Vitals. They affect the Largest Contentful Paint (LCP), which measures how long it takes for the largest element above a page fold to load. To ensure a good user experience, an LCP of 2.5 seconds is recommended.
In some cases, images that load slowly also have a negative impact on the Cumulative Layout Shift (CLS). CLS measures the visual stability of a page. It gives a value to the number of unexpected layout shifts that take place when a user is browsing. A layout shift happens when content “jumps” around the page because a visible page element shifted positions between rendered frames. The recommended CLS score is 0.1 or lower. The lower the score, the less minimal unexpected layout shifts.
When there are images on your website that require encoding, Google PageSpeed Insights will trigger an “Efficiently Encode Images” issue.
You can get even more specific data with Google’s Lighthouse.
The free tool scans images on a page and allocates an 85% compression level. It then compares the original image with the compressed image. If the potential saving is 4KiB (kibibytes) and above, the tool will flag the image as optimizable. The tool also collects each image on a page, converts it into a less heavy image format (more on this later), and then reports potential savings based on the conversion.
The website owner can then optimize these images one by one to boost loading speeds and improve the user experience.
Another option is to delete some of these unoptimized images that don’t add value to the site. For instance, you can use tools like Google Analytics 4 to check which visuals drive the most traffic from Google Images to your site. These are the images you may want to retain and optimize. Those that don’t bring in traffic and only succeed in bogging down your loading speed can be deleted.
Does all this sound like a lot of extra work for you? Then the best solution for you is to optimize your images as you upload them to your website and make adjustments if needed then and there. WordPress, for instance, automatically compresses JPEG images. There are also third-party tools that are compatible with WordPress that allow you to compress images even further. We’ll talk more about these later.
Running speed tests often can help you determine how your site is doing. Then, implement these eight optimization tips to boost loading speed. Some strategies, like numbers 1 to 3, are specific tactics for efficient image encoding.
Change the format of your images from JPEG and PNG to Next-Gen image formats AVIF or WebP formats. As I mentioned, JPEG and PNG are naturally large files that require more time to load.
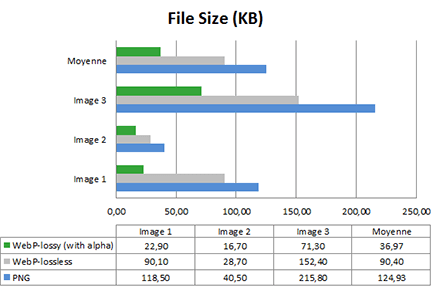
WebP, on the other hand, is a Next-Gen format that Google claims is 25%-34% smaller in file size than JPEG.
The image below shows that WebP is also lighter than the PNG format, whether compressed using the lossy or lossless method (we’ll talk about these compression methods later):

Images encoded in AVIF, meanwhile, are, on average, even 30% smaller than WebP. AVIF, however, is still not supported by Firefox, Edge, Chrome on mobile, and other browsers.
Since WordPress 5.8, WordPress has supported WebP images by default. In March 2022, WordPress also announced plans to enable the CMS to automatically generate WebP images from JPEG uploads. The WebP versions shall be used as the site’s content.
In July of the same year, WordPress announced tweaks to that proposal based on research results. To address potential storage issues, WordPress said its WordPress 6.1 version would automatically generate WebP versions only of core image sizes instead. An opt-in mechanism, it said, will instead be implemented for images with custom sizes to be converted into WebP images.
There has been no known update to that proposal so far. But don’t worry. With the pending implementation, you can easily convert your WordPress site images into the Next-Gen format using NitroPack. It changes images into the WebP format and then keeps their original forms as a backup.
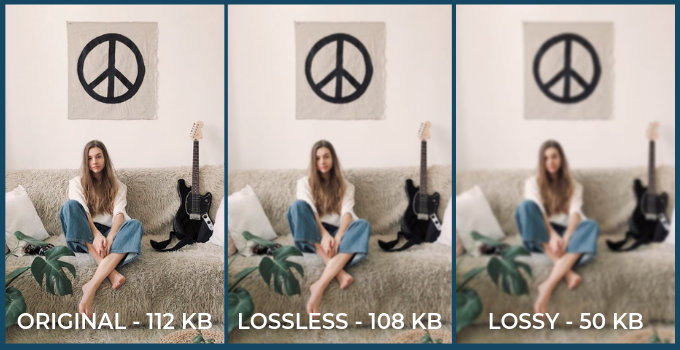
When you compress an image, you essentially reduce its file size. Depending on how much you want your image quality to be affected, you can go for lossless or lossy compression.
Lossy compression removes data from an image or file that cannot be recovered once it is decompressed.
Lossless compression, on the other hand, allows you to recover lost data once the file or image is decompressed.

In terms of resulting image file size, lossy compression may be better. It yields a file size that’s smaller than the one that results from lossless compression.
However, depending on the type of website you run, you can choose one of the two methods for compression. For instance, while most eCommerce websites will find lossy compression ideal (its images ensure a clear presentation of products without contributing much to page weight), photography sites that require high-resolution displays tend to opt for lossless compression.
If you’re a technical person, you can use tools such as Imagemin to manually compress your images. Free online tools like Compress JPG and TinyPNG are great for those who don’t know how to code.
What if your images have already been uploaded to a WordPress site, and you’re not a technical person?
You can use a site optimization solution like NitroPack if you want another layer of compression to your images apart from what WordPress provides by default (more on this later):

Just specify your desired image quality, and NitroPack will do the rest.
As I briefly mentioned earlier, by default, WordPress automatically compresses images to 90%, to be exact. The content management system applies the default compression to derivative thumbnail versions it creates when you upload JPEG images to the media library.
What if you used third-party tools like TinyPNG to compress your images before the actual uploading to the media library? Well, WordPress will still apply its default compression setting. The thing is, the cumulative compression may result in images that don’t look as sharp as you expected. That’s why you may want to tweak WordPress’ default compression setting.
To do this, just add this single line of code to your functions.php file, and change the number according to your desired compression level.

The “100” in the image above means no compression. The smaller the number, the more compression WordPress will apply. If you think the cumulative compression still isn’t enough, you can use a tool like NitroPack as I mentioned earlier.
Before you edit your functions.php file, create a backup of the file. This way, if you end up with a white screen after inputting the code, you can always replace your edited functions.php file with the backup version.
You should resize your images before uploading them to your site. The goal is to have clear images that don’t have that much weight that can bog down your loading speed.
For this, the rule of thumb is to always serve images that would fit the user’s screen.
For instance, the standard background image dimensions for desktop are 1920 x 1080 pixels. Here are recommendations for mobile:
Image resizing can either be done manually or automatically. If you opt for the manual route, you can use software like Photoshop that shows you image dimensions you can tweak. What if you have too many images to resize? Then, use tools like Apify to download images in bulk. You can then just bulk upload the images to your chosen software for visual rescaling and upload them to your site.
If you’re using WordPress as your content management system, you can easily resize your images manually, too. You can do this by scaling or cropping. When you scale an image, you resize it without changing its original proportions. The result is that the final image doesn’t seem like it’s stretched. When you crop an image, you make it smaller by removing the unwanted portions.
To scale or crop your WordPress site images:
We’ll talk about automatic image resizing later when we discuss responsive images.
Lazy loading refers to a technique of delaying the loading of images and other web page content until the site visitor needs it. Lazy loading ensures there are less elements on a page–and therefore less page weight–given a specific time. That means it’s also a great way to ensure faster loading times.
There are several ways to implement lazy loading: manually by writing code or automatically. If you opt for the automated route, you can use a plugin or a content management system with a default lazy loading option like WordPress.
Here are examples of attributes to add to image tags if you prefer to go the manual route. The problem with this option is that you need to have some basic technical knowledge. Even if you do know code, it’s going to take up a chunk of your time. Writing in general, after all, is a time-consuming process.

The automated option is ideal for you if you aren’t comfortable with writing code or simply don’t have the time to do so.
The latest WordPress versions (5.4 or higher) come with a lazy-load images feature by default. In fact, WordPress 6.3 even now automatically adds the “fetchpriority” attribute with a “high” value to the image it determines to be most likely the Largest Contentful Paint image, or the largest image in the viewport. According to WordPress, the attribute essentially tells the browser to fetch this image even before it has analyzed the layout. The result? An LCP improvement of 5 to 10%.
The WordPress 6.4 version also comes with new filters that allow you to effectively control loading optimization attributes. For instance, you can use the wp_get_loading_optimization_attributes filter if you want a specific image in your post to lazy-load more quickly than the others. WordPress also implemented fixes for it to reliably detect when to omit the “loading” attribute from some images.
To upgrade your WordPress version for automatic image lazy loading, just upgrade to the latest WP version.
The thing is, while the automated method is easier, you won’t have as much control over which images to lazy-load unless you’re using at least the WordPress 6.4 version.
Using a plugin is the better option in this case. NitroPack gives you control by allowing you to specify for which CSS selectors you want the lazy loading disabled. CSS selectors enable developers to target and style HTML elements on a page.
CDN stands for Content Delivery Network. CDNs enable the storage of cached copies of website content, including images, across their interconnected servers. As a result, this content can be served to site visitors from a server that’s nearest to them.
Let’s say your origin server is in the U.S. and you have a site visitor from India. If you use a CDN, the content from your site will be served to your site visitor from servers in or near India.
Now what’s the benefit of this? Well, apart from other benefits like increased server uptime and improved security, your loading times are greatly reduced, of course.
Essentially, CDNs shorten the distance between a user and the origin server through a closer point of presence. That means latency—or the time it takes for a request to reach the origin server and for the server to begin processing and sending the data–is shortened.

Plus, Web Dev found that when you switch to a CDN, you can get up to 80% savings in image file size–and therefore less page weight.
If you’re looking for a CDN for your WordPress site, NitroPack is again worth mentioning here. It’s pre-configured, which means you don’t have to set it up manually. NitroPack’s CDN serves web content, including images, between 5 and 20 ms from the nearest edge location.
Browser caching refers to the process of browsers storing webpage resources locally. The browser cache is the storage space the browser uses to temporarily save static files. This is located in the computer’s hard drive.
You can also leverage browser caching on WordPress using a plugin like NitroPack. When you install the plugin and enable Cache Warmup and HTML Compress, NitroPack ensures your pages are prepared for visitors without depending only on organic traffic. NitroPack also automatically sets the required caching headers to address issues flagged by Google PageSpeed Insights related to proper browser caching.
Overall, when browser caching is implemented, the next time a user wants to access the webpage, the files will be loaded from the cache instead of being downloaded again. This reduces the amount of data the server needs to transfer to the browser, further improving page loading time.
Keep in mind that the amount of data savings you get depends on the available storage on the user’s device. Since this can vary greatly, it’s advisable to use some of the other points discussed earlier in this article to reduce image file size.
Responsive images adjust their resolution and size to match the size of the device they’re being viewed on. In other words, if a user views the images on a mobile device, they reduce in size to a width of 400 pixels. If they view it on desktop devices, the image will be displayed with a width of 1080 pixels. You can call this automatic image resizing.
Here are examples of responsive images:

Responsive images take fewer resources to be displayed, significantly reducing loading speed. Search engines like Google also favor websites that adopt responsive design. This means your site will likely rank better if you use responsive images.
Native responsive images features have been available on WordPress since its 4.4 version. They involve including srcset and sizes attributes to the image markup generated by the CMS. By including the available sizes of an image in the srcset attribute, WordPress can automatically display the right image size based on a device’s screen size. With WordPress’ default sizes attribute, meanwhile, a browser can intelligently request the right image size that fits its (the browser’s) window or even resolution size.
However, the above approach requires some knowledge of code. Those who are less technical are better off using plugins like NitroPack. NitroPack uses a refined approach to automatic image resizing.
NitroPack is your all-in-one go-to WordPress plugin for efficient image encoding and quick loading times.
You can convert your images into the Next-Gen formats without spending time and effort on manual configurations. The plugin also has a powerful image compression feature you can use alongside WordPress’ default compression setting.
You can also leverage browser caching through NitroPack’s Cache Warmup and HTML Compress features. And with its built-in CDN, you can load your site content, including images, in seconds.
That’s not all. The plug-in also offers a potent automatic image resizing feature. It applies adaptive image resizing to all standard images identified by a markup element for an image in HTML. So, the responsive resizing covers elements such as:
With this NitroPack feature, you can reduce the hundreds of hours you’d need to spend to perform repetitive manual image resizing tasks.
Overall, NitroPack can greatly enhance the user experience. Don’t forget to complement it with other UX best practices for the best results. Remember, page speed is just one component of the user experience. There are other just-as-important components like accessibility and usability.
For instance, incorporate good captions so that visitors can understand your images in the first place. You can use AI to help you craft these quickly and at scale. Although there are generative AI risks like “AI hallucinations,” these can be easily overcome. For instance, you can just ask proofreaders to quickly go through the write-ups the tool produces to ensure they’re 100% factual.
Also, ensure a clear and consistent site navigation. Organize your content logically and leverage familiar navigation patterns.
Follow these tips, and you’ll see those site visitors coming in droves.
The best image formats for web performance are WebP and AVIF. They are lighter than JPEG and PNG, allowing your images to load faster.
You can automate the image optimization process for your website by using tools like NitroPack. NitroPack offers the full image optimization stack with features such as adaptive image resizing and lazy loading. It ensures your images are clear while optimized for faster loading times.
Using lazy loading ensures there are fewer elements on a page–and therefore less page weight–given a specific time. This boosts site speed and improves website performance.
You can balance image quality with file size by applying image encoding methods such as compression and converting images into next-gen formats.
There are several recommended practices for images to improve loading times. Use responsive images so their sizes will automatically be adjusted based on the screen they’re viewed on. Alternatively, you can manually resize images to ensure they don’t have that much weight.
Lazy loading is another recommended practice. Efficiently encode images by, among others, converting them into next-gen formats and compressing them to also boost your loading speed.

Lora has spent the last 8 years developing content strategies that drive better user experiences for SaaS companies in the CEE region. In collaboration with WordPress subject-matter experts and the 2024 Web Almanac, she helps site owners close the gap between web performance optimization and real-life business results.